Holy Cow is each day flying by right now. Suzy's workshop is in full swing making Christmas Stockings, Tree Skirts and Family Trees.
I got a nice surprise yesterday and found that I was featured in a great holiday treasury on the FRONT PAGE. Only the second time I have been there and sooo exciting. Here's a look if you missed it:
In other exciting news I am also going to have my line of re-useables featured in a new local boutique. It's called Urban Boutique and located at 436 W Bakerview Rd Suite 107. Urban Boutique is featuring many local artists with an eco friendly vantage point.
Cheers!
Wednesday, November 10, 2010
Sunday, October 31, 2010
Long Time No Talk
Wow has life been busy! I have been designing creating and selling. All good things, but boy does it take time. Here are a few new tree quilts that have come out of my studio:

 Another new addition to my life is my fabric shop. Visit me at www.suzyqsfabric.etsy.com. I have great new fabrics coming in all the time. Here are a few:


 I have surprise sales in my fabric shop all the time so visit me often.
Finally it's Christmas Stocking time again. Order your stockings and tree skirts before time runs out:


Finally it's Christmas Stocking time again. Order your stockings and tree skirts before time runs out:


Thursday, May 13, 2010
Front Page Madness
It's been a little while since I have posted, but so much has been happening! Although most of it is good I have had a couple of hiccoughs as well. First I had a quilt on the FRONT PAGE of ETSY!!! That was soo exciting! Over 900 views and a gazillion harts in 20 minutes, whew!! Here's the quilt that made it:

Here is what the treasury looked like while it was there! So many beautiful things!

The next life event wasn't so great, I was playing soccer in my usual Monday night game and took a full force slide tackle to my right ankle. This left me with bruise halfway up my leg and crutches to hobble around on. I am much better now and hoping to be back on the fields next week.
The most recent great this was I found out when I got home from soccer practice this evening that a Treasury I had put together was on the FRONT PAGE of ETSY. To top it off it featured some of my great team mates from my Quiltsy Team. Here is what it looked like:
Tuesday, April 13, 2010
The Tree is Complete!
With Spring Break for my kids last week my time got limited and I needed to get the tree quilt to it's new home. Unfortunately I don't have detailed pictures on my process for the final steps, but I will use the completed pictures to highlight the steps.
After I have my sandwich put together I select my bobbin thread color to match the backing and then a green thread that compliments all of the leaf colors. I then use a small zig zag stitch to secure the edges of the leaves to the quilt. This gives the leaves a leafy feel and ensures that they will never come off.


Working my way around the quilt until all of the leaves are secured. Then I switch my top thread to a brown and use a small zig zag to secure the edges of the trunk.

Next I quilt the rest of the quilt. This one I decided to use a medium meander. You could do less quilting if you desired, but I like everything to stay put and not look like the fabrics are sagging or held loosely together.
I quilted the interior with a cream thread and the border with a black using the same bobin thread throughout.
Next you need to bind in your favorite manner. I have tried many ways but my tried and true method is to:
1.Join my strips, 5-1/2 needed for this quilt, by putting the ends at a 90 degree to each other and sewing across the diagonal.
2. Press the strip lengthwise in half with wrong sides together.
3. Leave a tail at the beginning of about 9 inches, reinforce stitch to start, then on the front of the quilt line the cut edge of the binding with the cut edge of the quilt. Sew 1/4 inch from the edge around the perimeter stopping about 18 inches from where you started.
4. Here comes the tricky part, lay the 9 inch tail along the quilt edge then overlap the 18" piece over the top. Mark with a pin on the long tail where the short tail ends. Open flat the two ends of binding. With right sides together put the 9" piece at 90 degree to the longtail with the edge at the pin. Pin across the diagonal and fold open testing that when joined it will connect one end to the other in a straight strip. Sew across the diagonal and trim 1/4" from stitch line. Open up and press in half.
5. Stitch remaining section of binding down to quilt.
6. Turn the binding to the back and whip stitch along the stitch line from the front.
The binding completes the quilt.


This quilt will become a family heirloom to be passed from generation to generation. The construction is such that it can be washed and loved and used.
Enjoy!
Monday, April 5, 2010
Custom Tree Quilt Next Steps
I have diligently been working away on this tree quilt and have several new steps to share with you. We left off last time with arranging and tacking the leaves to the quilt as well as removing the marking lines from the background.
The next step I do is to press the piece really well. When you do the thread play like I have done you will get a little bit of mis-shaping no matter how well you stabilize. The better you stabilize the less mis-shaping, but it is inevitable with the heavy stitching I use.
 After I press really well using a hot iron and steam I fold the piece in half. Grab the top edges of the quilt with your finger tips and hold up in the air if front of you. If the fabric doesn't hang straight and has a bit of a curl at the fold slightly shift the two layers to the left or right until it hangs straight. Once you have done this I lay the piece on my cutting table careful not to shift the layers. Then I trim the sides and top and bottom.

 After I have done that I measure the top and bottom to make sure they are the same width and then measure from corner to corner in both directions. This will ensure that the piece is square.
Once I have done that it is time to add the borders. Note: If you do not square up the center before you put your borders on your borders will appear wavy and the corners not square which will then translate to your finished piece.
For the borders I take my fabric and make a straight edge cut, then cut my strips.

 To determine how many strips I need I first determine how I want to attach my borders. You can start at the top and work your way around the sides making a log cabin type look, you can miter the corners or you can do top and bottom the sides or vice versa. In this case I am going to put my side borders on first and them cap with my top and bottom. So I measure the length of the piece and multiply by 2. Then I measure the width and add the border width on both sides, in this case I have a 4 inch finished border so I will add 8.5 inches to the width of the piece. Then multiply by 2. Add the width number and the legth number and that is the total number of inches of border that you will need. I then take that number and divide by 40 (width of fabric) and that gives me the number of strips I need.
For this quilt I used 5 strips at 4.5" wide. After cutting my strips I line up the selvege edges, layer and cut off the selvege.
 Next I sew the border pieces end to end right sides together to make one long strip.
 The reason I do this is because I want to waste as little fabric as possible and I want to vary where the seam lines are. If I had centered the seams on each side I would have needed 8 strips instead of 5 and would have had 8 pieces about 20" long to go in my scrap bin. In this case I ended up with one piece about 15" long.
 After I sew my border strips together I press the seams to one side or the other and begin attaching to my center piece. Once one side is stitched I press toward the border and trim off the tail.
 Continue this method until all four sides have their border on.
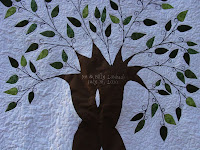
For this quilt I have a quote or saying that I am adding to the lower border. You can do this with many methods, applique, in the quilting or as I am doing embroidery.
First I spray the bottom border with spray starch and iron on both sides to give the fabric itself some stabilization. Then I iron on my Sulky Iron and Tear stabilizer to the back side of the fabric. For this quilt I will also use a heavy tear away stabilizer in the hoop since the embroidery will be close to and edge.
Next I used my chalk pencil and drew a line 1" from the bottom of the border to give me a reference line to keep the letters straight. Then I programmed each word into my embroidery software. On my machine I feel most comfortable doing each word individually versus all in one file and re-hooping. Then I determine the length of each word, add in my space between words and get the total length of the phrase. Working from the center out I determine my starting point for each of the words and mark with chalk. Then hoop your fabric using your grid insets in the hoop to make sure the fabric is straight and line up your starting point for the embroidery.

 Now that the front is put together it is time to prepare your sandwich for quilting and finishing. On this quilt I decided to use a flannel fabric. Flannel is my preferred backing, I like quilts to be soft and snuggly. I also use Warm and White Cotton batting. I like the weight thicknes and warmth of this particular batting.
Find a hard surface to lay your project on whether it be a table or the floor anything will work as long as you can spread the entire project out. I use the floor since I don't have a table big enough.
Place your backing fabric face down smoothing out all the wrinkles, then carefully place the batting over the top again smoothing out the wrinkles. I like to pre-cut my back and batting so it is just a couple of inches longer and wider than the piece. This is much easier for me to handle and line everything up when I am not going to quilt on my frame. Finally lay your top face up on top of the batting layer smoothing all wrinkles and creases. Then pin with safety pins about a fist apart from each other across the entire top of the quilt.


The next steps to come are securing the leaves to the quilt, finishing the edge of the trunk, quilting the quilt and binding the quilt. Then it will get shipped off to it's new home for the new owners to enjoy for a lifetime!
The next step I do is to press the piece really well. When you do the thread play like I have done you will get a little bit of mis-shaping no matter how well you stabilize. The better you stabilize the less mis-shaping, but it is inevitable with the heavy stitching I use.


Once I have done that it is time to add the borders. Note: If you do not square up the center before you put your borders on your borders will appear wavy and the corners not square which will then translate to your finished piece.
For the borders I take my fabric and make a straight edge cut, then cut my strips.


For this quilt I used 5 strips at 4.5" wide. After cutting my strips I line up the selvege edges, layer and cut off the selvege.


For this quilt I have a quote or saying that I am adding to the lower border. You can do this with many methods, applique, in the quilting or as I am doing embroidery.
First I spray the bottom border with spray starch and iron on both sides to give the fabric itself some stabilization. Then I iron on my Sulky Iron and Tear stabilizer to the back side of the fabric. For this quilt I will also use a heavy tear away stabilizer in the hoop since the embroidery will be close to and edge.
Next I used my chalk pencil and drew a line 1" from the bottom of the border to give me a reference line to keep the letters straight. Then I programmed each word into my embroidery software. On my machine I feel most comfortable doing each word individually versus all in one file and re-hooping. Then I determine the length of each word, add in my space between words and get the total length of the phrase. Working from the center out I determine my starting point for each of the words and mark with chalk. Then hoop your fabric using your grid insets in the hoop to make sure the fabric is straight and line up your starting point for the embroidery.


Find a hard surface to lay your project on whether it be a table or the floor anything will work as long as you can spread the entire project out. I use the floor since I don't have a table big enough.
Place your backing fabric face down smoothing out all the wrinkles, then carefully place the batting over the top again smoothing out the wrinkles. I like to pre-cut my back and batting so it is just a couple of inches longer and wider than the piece. This is much easier for me to handle and line everything up when I am not going to quilt on my frame. Finally lay your top face up on top of the batting layer smoothing all wrinkles and creases. Then pin with safety pins about a fist apart from each other across the entire top of the quilt.


The next steps to come are securing the leaves to the quilt, finishing the edge of the trunk, quilting the quilt and binding the quilt. Then it will get shipped off to it's new home for the new owners to enjoy for a lifetime!
Sunday, March 21, 2010
Custom Tree Quilt Next Steps
Many of the next steps you can work on simultaneously. The order won't affect the outcome of the quilt.
What I do next is start working on the branches. There are many different methods you can use for this, my current favorite is to use free motion quilting in what is commonly reffered to as thread play. Basically I draw the branches on with thread using my machine as the pen. Other methods might be stitching on cording, ribbon, hand embroidering them or maybe painting them on.


 Some quilters I have met or those new to machine quilting talk about being to uptight or machine quilting being too stressful. When I first started I would have a half a glass of wine with me next to my machine. I would sip on it as I went which would force me to relax and be more free flowing with my movements. With the amount of machine quilting I have been doing lately I would be tipsy all the time. So I have also found that a good piece of dark chocolate helps to get me in the mood for quilting.

Next I prepare the leaves. Sometimes I do this just before I finish up for the day and work on them while watching TV or a movie with my family.
Remove the side of the fusible paper that does not have the number on it. This side should not have the sticky fusible medim on it. Then randomly distribute the leaves between your varying greens of fabric and iron them on. Cut around each leaf about 1/8 - 3/16 of an inch outside of the fusible shape.
 Once I have all the branches stitched on I then get the piece prepared for embroidery.


For this piece I am using a taupe colored embroidery floss and the font will be King Charles. I think the sweeping letters of this font suit the style of quilt well.

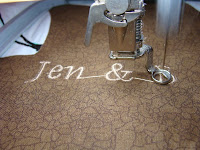
Once you are done tear away the stabilizer and cut the jump stitches. Then take a spray bottle of water and spritz the top where your markings are and let air dry. You may need to do this a couple of times for all of the blue to disapper, but one good soaking should do.
While your embroidery is going and your top is drying you can be working on you leaves.
You will need to find a method of organizing your leaves as you make them because you will be pulling off the last piece of paper which has your numbers on them. I like to lay them on top of my freezer paper design. This also gives me a mock-up before I tack them down to see if I want to move any around for better fabric placement.
Put the leaf face down on your ironing board or ironing surface. Fold over the edge of the leaf at the line of the fusible medium. You can use your finge, a pair of tweezers or a stiletto. Using the tip of your iron or a small iron like the ones made by clover secure the edge by fusing it. Work your way around the leaf and then trim off the excess at the tip. Wha Laaa You have a leaf.


Why do I do my leaves this way you ask. I love the convenience of fusible applique, but I prefer the look of needle turn. I don't have the patience for needle turn so this is my hybrid. Later I will show you how I secure the leaves to the tree, finish the edges of the trunk, add the borders and quilt and bind the quilt.
What I do next is start working on the branches. There are many different methods you can use for this, my current favorite is to use free motion quilting in what is commonly reffered to as thread play. Basically I draw the branches on with thread using my machine as the pen. Other methods might be stitching on cording, ribbon, hand embroidering them or maybe painting them on.


Next I prepare the leaves. Sometimes I do this just before I finish up for the day and work on them while watching TV or a movie with my family.
Remove the side of the fusible paper that does not have the number on it. This side should not have the sticky fusible medim on it. Then randomly distribute the leaves between your varying greens of fabric and iron them on. Cut around each leaf about 1/8 - 3/16 of an inch outside of the fusible shape.


For this piece I am using a taupe colored embroidery floss and the font will be King Charles. I think the sweeping letters of this font suit the style of quilt well.


Once you are done tear away the stabilizer and cut the jump stitches. Then take a spray bottle of water and spritz the top where your markings are and let air dry. You may need to do this a couple of times for all of the blue to disapper, but one good soaking should do.
While your embroidery is going and your top is drying you can be working on you leaves.
You will need to find a method of organizing your leaves as you make them because you will be pulling off the last piece of paper which has your numbers on them. I like to lay them on top of my freezer paper design. This also gives me a mock-up before I tack them down to see if I want to move any around for better fabric placement.
Put the leaf face down on your ironing board or ironing surface. Fold over the edge of the leaf at the line of the fusible medium. You can use your finge, a pair of tweezers or a stiletto. Using the tip of your iron or a small iron like the ones made by clover secure the edge by fusing it. Work your way around the leaf and then trim off the excess at the tip. Wha Laaa You have a leaf.


Why do I do my leaves this way you ask. I love the convenience of fusible applique, but I prefer the look of needle turn. I don't have the patience for needle turn so this is my hybrid. Later I will show you how I secure the leaves to the tree, finish the edges of the trunk, add the borders and quilt and bind the quilt.
It's All About..Vol 9
This treasury was a difficult one to get. Everytime I checked the opening time was right smack dab in the middle of soccer practice, then would have to wait another 30 or so hours for the next one. But, you know what they say...Persistance pays off!
I present for you, It's All About...SPRING!
 Featured sellers are: lmkquilts, Whimbrella, peskycatdesigns, GlassRiverJewelry, AmericaJane, DressGreen, uniquelynancy, clubaloha, ToBeTattooed, flandersfield, withhugsnstitches and josiemart.
Check out these great shops by clicking on their shop names.
Next Treasury theme will be: Books
I present for you, It's All About...SPRING!
Check out these great shops by clicking on their shop names.
Next Treasury theme will be: Books
Sunday, March 14, 2010
I've Been Featured for National Quilt Day!
A great friend of mine from my Quiltsy Team on Etsy put together a fabulous blog post in honor of National Quilt Day. Every day this week Quilting Frenzy (Ann) will be doing a new post on her blog highlighting different styles and techniques of quilting. I am so honored to be included in her first post.
You can visit the blog by clicking here.
The quilt that was featured is one of my favorites and quickly becoming one of the most popular in my shop, it is my Family Tree Quilt.
.JPG)
QuiltingFrenzy has a finatastic shop on Etsy and is a very talented quilter. Some of my most favorite items from her shop are:


Who would have thought to make a quilted easter basket! So original and so creative. LOVE IT!
Friday, March 12, 2010
It's All About...Vol 8
What a crazy treasury day yesterday was! I was able to slip in and get a Treasury West using my next theme HOT PINK. Then I had to leave to help in my daughter's classroom before main Treasury opened. I heard from friends that it shot up to over 1000 in seconds and many people had to reload theirs. I know I couldn't open any of them until this morning. Guess that's a little too much traffic for the servers to handle!
 Check it out while you still can!
The next treasury theme will be .... Spring.

The next treasury theme will be .... Spring.
Muted Figgy Pudding Featured in the Storque!
What a great way to start off the weekend. First I found out that my Muted Figgy Pudding quilt was included in this week's voter.
 To get to the voter and cast your vote, click here.
Then I found out that they also did a Storque article to go along with the voter since this is National Quilt month.
 YayMe!

Then I found out that they also did a Storque article to go along with the voter since this is National Quilt month.

Subscribe to:
Posts (Atom)
